


Selecting the best PW7A2 builds and loadouts is the first step toward dominating the high-speed chaos of Battlefield 6.
This submachine gun, modeled after the iconic MP7A2, has quickly become the gold standard for players who want to maintain maximum mobility without sacrificing laser-like precision.
Whether you are flanking behind enemy lines in the urban ruins of Germany or holding down a tight objective in the RedSec battle royale mode, the PW7A2 offers a fire rate and handling profile that few other weapons can match.
Why is the PW7A2 the meta choice right now?
The PW7A2 dominates the current meta because it combines a blistering fire rate with some of the most manageable vertical recoil in the game.
In Battlefield 6, where the "Time to Kill" (TTK) is incredibly tight, getting those first few shots on target is everything.
Because this weapon uses 4.6x30mm ammunition, it offers higher muzzle velocity than many of its competitors, such as the KV9 or the USG-90.
This means you don't have to lead your targets as much, even when they are pushing into that 30 to 40 meter mid-range sweet spot.
Beyond the raw stats, the weapon’s true strength lies in its versatility. While it is officially classified as a PDW (Personal Defense Weapon), the right attachments can stretch its effectiveness far beyond the typical "spray and pray" distance of most SMGs.
It feels lighter than an assault rifle but hits with a consistency that makes it feel much more reliable than the high-recoil SGX.

What is the best PW7A2 loadout for close-quarters combat?
The best close-quarters loadout for the PW7A2 focuses on hip-fire accuracy and sprint-to-fire speed to ensure you win every face-to-face encounter.
When you are clearing rooms or pushing into objective hubs like those found on the Contaminated map, you do not always have the luxury of aiming down sights (ADS).
This build, often called the "Shredder," is designed to let you fire accurately the moment an enemy appears on your screen.
- Muzzle: Linear Compensator (Reduces first-shot recoil and horizontal drift).
- Barrel: 180mm Standard (Maintains the fastest ADS speed possible).
- Top Accessory: 50 MW Green Laser (Massive boost to hip-fire control).
- Underbarrel: Classic Vertical Grip (Stabilizes the climb during long bursts).
- Magazine: 40RND Extended Mag (Essential for taking on multiple enemies without reloading).
- Ammunition: Full Metal Jacket (Increases penetration against light armor and thin cover).
- Optic: SU-123 1.25x (Clear sight picture with minimal visual clutter).
This specific setup thrives on aggression. The 50 MW Green Laser is visible to enemies, which can be a downside, but in close quarters, they will usually see you anyway.
The trade-off for near-perfect hip-fire accuracy is well worth it.
How do you build the PW7A2 for stealth and flanking?
You build the PW7A2 for stealth by prioritizing sound suppression and staying off the mini-map while maintaining a high damage-per-second output.
Flanking is a core mechanic in Battlefield 6, especially on the larger hybrid maps where teams tend to cluster around central capture points.
If you can get behind a squad without alerting them, you can wipe all four members before they even realize where the shots are coming from.
- Muzzle: Standard Suppressor (Hides muzzle flash and keeps you off the radar).
- Barrel: 180mm Standard (Avoids the mobility penalties of heavier barrels).
- Side Accessory: 120MW Blue Laser (Better for ADS stability compared to the Green Laser).
- Underbarrel: Slim Angled Grip (Boosts your ADS speed, allowing you to react faster).
- Ammunition: Subsonic (Eliminates tracer rounds so enemies can't track the origin of your fire).
- Optic: Mini Flex 1.00x (The cleanest red dot for quick target acquisition).
The addition of Subsonic rounds is the secret sauce here. In the chaos of a 128-player match, tracer rounds are a dead giveaway of your position.
By removing them, you can often secure a kill and move to a new piece of cover before the enemy’s teammates can pin you down.
Which class works best with the PW7A2?
The Engineer class is the undisputed champion for the PW7A2 because of its specific weapon proficiency bonuses.
In Battlefield 6, classes are more than just a gadget choice; they provide passive buffs that can drastically change how a weapon performs.
The Engineer receives a significant boost to hip-fire control and reload speed when using SMGs and PDWs, which directly addresses the PW7A2’s high fire rate.
- Primary Gadget: RPG-7V2 (Versatile against both infantry and light vehicles).
- Secondary Gadget: AV Mine or Repair Tool (Depending on whether you are attacking or defending).
- Secondary Weapon: P18 (A reliable automatic sidearm for when your primary runs dry).
- Throwable: Frag Grenade or Smoke (Smoke is better for closing the gap in open areas).
Using the Engineer class allows you to lean into the aggressive nature of the PW7A2. If you run out of ammo in your 40-round magazine during a chaotic firefight, that class-based reload speed buff might be the only reason you survive the encounter.
Can the PW7A2 compete at medium range?
The PW7A2 can absolutely compete at medium range if you swap your attachments to prioritize recoil stabilization and muzzle velocity.
While most SMGs start to feel like pea-shooters beyond 20 meters, the PW7A2’s 4.6x30mm rounds maintain their lethality up to about 45 meters.
To make this work, you need to move away from the hip-fire builds and focus on "beaming" targets while aimed down sights.
- Muzzle: Single-Port Brake (Excellent for controlling vertical climb during sustained fire).
- Barrel: 180mm Heavy Prototype (Increases effective range at the cost of some mobility).
- Underbarrel: Slim Angled Grip (Essential for maintaining a fast ADS speed with the heavier barrel).
- Ammunition: High-Velocity (Reduces bullet drop and travel time for distant targets).
- Optic: SU-230 4x Variable (For maps with longer lanes where you need the extra magnification).
When using this mid-range build, you should avoid holding down the trigger indefinitely. Even with a Single-Port Brake, the horizontal bounce can become unpredictable after the first 15 rounds.
Micro-bursting is the key to success here. Fire in 5 to 7 round bursts to reset the recoil and keep your shots centered on the enemy’s upper chest or head.
How do you unlock the PW7A2 in Battlefield 6?
You unlock the PW7A2 by reaching Level 19 in the global progression system.
Unlike some of the more niche weapons that require specific in-game challenges (like getting a certain number of headshots with a specific class), the PW7A2 is a straightforward level-up reward.
This makes it accessible to most players within the first few days of play.
If you are looking to speed up the process, focusing on objective play is significantly more rewarding than just chasing kills.
Capping a flag or reviving a teammate provides a steady stream of experience points that will get you to Level 19 much faster.
Once unlocked, the initial grind for attachments can be done quickly in the smaller-scale TDM modes or the "Extreme Measures" phase of Season 2.
What are the most important stats to watch for?
The most important stats for the PW7A2 are its Mobility and Control, which sit at a base of 73 and 52 respectively.
These numbers tell a clear story: the gun is designed for moving fast, but you need to put in work to keep it steady.
The high mobility score means your "strafe speed" (how fast you move side-to-side while aiming) is superior to almost every assault rifle in the game.
- Muzzle Velocity: 600 m/s (Standard for this class, but can be boosted).
- Reload Time: 2.134 seconds (Very fast, allowing for high uptime).
- Headshot Multiplier: 1.35x (Reward for precision in close-quarters duels).
A common mistake players make is over-extending their builds into "Precision" stats. Because the PW7A2 is an SMG, you will never truly compete with a DMR like the SVK 8.6 at 100 meters.
Instead, focus on maximizing that 73 Mobility stat. If you are harder to hit, you have more time to land your shots.
How does connection speed impact your PW7A2 performance?
Connection speed and ping play a massive role in how the PW7A2 feels because its high fire rate demands instant feedback from the server.
If you are playing with a ping of 100ms or higher, you might find yourself losing "super bullets" or experiencing "ghost bullets."
This happens when the server doesn't register your shots because of latency, even though you saw the hit markers on your screen.
In a game like Battlefield 6, where 128 players are constantly sending data to the server, packet loss can be a death sentence for an SMG user.
Since you rely on being faster than the other guy, any delay in your input can mean the difference between a multi-kill and a trip back to the deployment screen.
This is where NoPing becomes an essential part of your loadout. By optimizing the route your data takes to the game servers, NoPing reduces latency and stabilizes your connection.
This ensures that every bullet from that high-RPM PW7A2 actually counts. When your ping is low and your jitter is minimized, the weapon feels significantly more responsive, almost like the "laser beam" many community members describe it as.
Here’s how to use NoPing to fix network issues in Battlefield 6:
- Sign-up through the website and download NoPing (you can try it for free)
- Open NoPing and search for Battlefield 6 inside the software
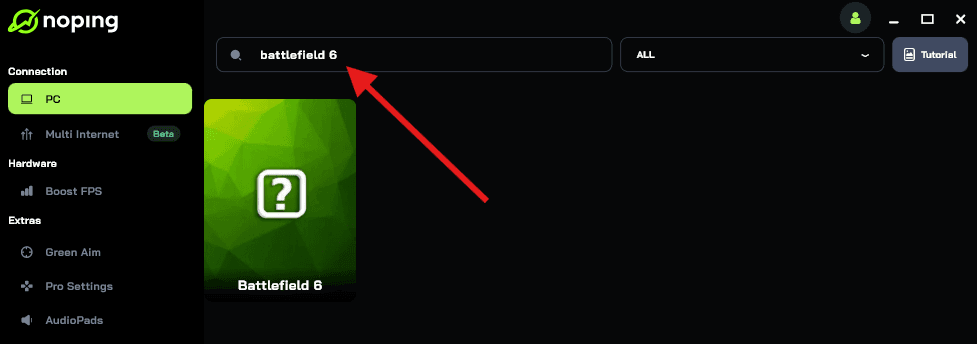
- Once you find Battlefield 6, click on it. Choose your server on the next screen and click on “Optimize Game”.
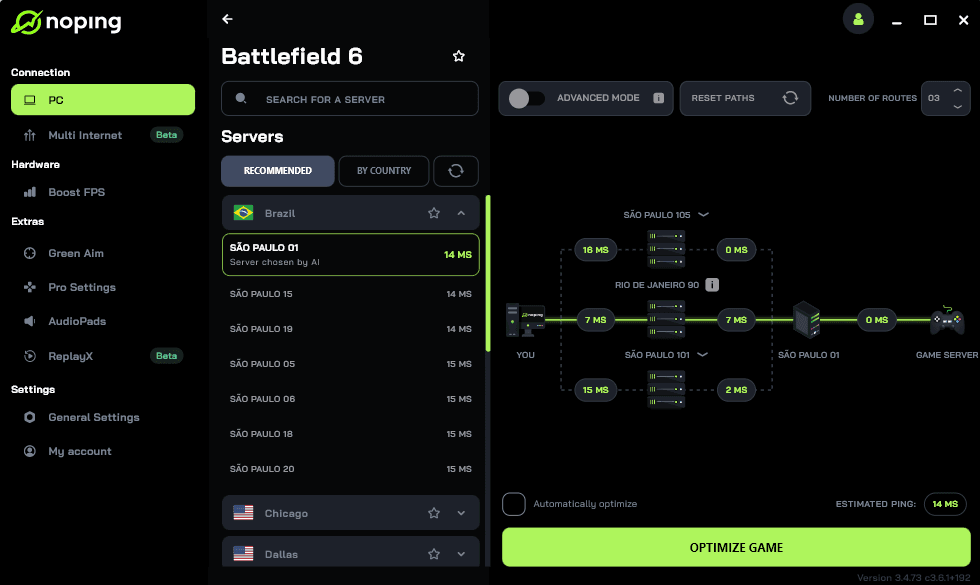
- And that’s it, you can start playing Battlefield 6 with optimized ping!
You can test different servers within NoPing to see which gives you the lowest latency.
Is the PW7A2 better than the SGX?
Whether the PW7A2 is better than the SGX depends entirely on your playstyle and your ability to control recoil.
The SGX technically has a higher raw damage output at point-blank range, making it a favorite for the most aggressive "entry fraggers."
However, the SGX has a much more violent recoil pattern that kicks aggressively to the right, making it difficult to use beyond 15 meters.
The PW7A2 is the more balanced choice. It offers a slightly slower TTK in exchange for significantly better range and much easier recoil control.
For most players, the consistency of the PW7A2 will lead to more kills over the course of a match than the raw power of the SGX.
If you can't hit your shots, damage stats don't matter, and the PW7A2 makes hitting those shots much easier.
What are the best maps for the PW7A2?
The best maps for the PW7A2 are urban-focused environments like Hagental Base or the tighter sections of the Contaminated map.
These locations are filled with narrow corridors, stairwells, and small rooms where the PW7A2’s fire rate and hip-fire accuracy truly shine.
On these maps, you can use the environment to force engagements into the 0 to 20 meter range where you have the advantage over assault rifles and LMGs.
On larger, more open maps like those featuring the Pax Armata infiltration, the PW7A2 requires a bit more care. You need to use vehicles or smoke grenades to move between cover.
Never get caught in the middle of a wide-open field with an SMG. If you must play these maps with the PW7A2, stick to the POIs (Points of Interest) that offer indoor combat or high-density cover.
The PW7A2 is a masterclass in modern PDW design within the Battlefield universe. By choosing the right loadout and pairing it with a stable, low-latency connection, you can turn this weapon into a terrifying tool of destruction.
Focus on your mobility, learn the burst patterns, and always keep an eye on your flank.
Play BF6 without lag. Download NoPing now and start your free trial!