

Black Ops 6 Installation Issues can show up right when you are excited to jump into the action, and that can be incredibly annoying.
It is not always clear what went wrong or how to fix it. The good news is that most of these problems have simple solutions.
Whether you are on PC, Xbox, PlayStation, or using different launchers like Steam or Battle.net, there are reliable ways to get the installation back on track and finally start playing.
Let’s go through what causes these problems and how you can solve them step by step.
Common Installation Problems
1. Error Code 0x80073CF6
This error typically occurs when trying to install the game through the Microsoft Store or Xbox app.
Players have reported encountering this error code during the download process. A suggested workaround involves deleting a specific folder and resetting the Xbox app:
- Open Windows Explorer and enable viewing of hidden items.
- Navigate to C:\Users\<username>\AppData\Local\Packages\.
- Locate and delete the folder associated with the game.
- Go to Settings > Apps > Installed Apps > Xbox.
- Click on 'Advanced options' and select both 'Repair' and 'Reset'.
After completing these steps, attempt to reinstall the game.
2. Grayed-Out Install Button on Battle.net
Some players have experienced the install button being grayed out on Battle.net, even after purchasing the game. A workaround that has helped others involves changing the region setting:
- Log out of Battle.net.
- On the login screen, change the region to 'Europe'.
- Log back in and check if the install button is now active.
This method has reportedly resolved the issue for some players.
3. Installation Stopped on Xbox Consoles
Players on Xbox consoles, such as the Xbox One S, have reported the 'installation stopped' notification during the installation of Black Ops 6. A recommended solution is to clear the storage cache:
- Press and hold the power button on your Xbox console until it turns off completely.
- Unplug the power cable for about 10 seconds.
- Plug the power cable back in and turn on the console.
- Attempt to reinstall the game.
If the issue persists, consider checking for system updates or reinstalling the game.
4. DirectX Errors on PC
Some players have encountered DirectX errors when launching the campaign mode on PC, particularly when using certain AMD graphics cards.
Activision is aware of this issue and is investigating it. In the meantime, ensuring that your graphics drivers are up to date may help mitigate the problem.
5. Missing Campaign Files on Steam
Players on Steam have reported missing campaign files, preventing them from accessing the single-player mode. A suggested solution involves downloading specific files using the Steam console:
Press Win + R to open the Run dialog.
Type steam://open/console and press Enter.
In the console, enter the following command:
download_depot 1938090 2790690 9139952417526134145 1304195288796321402
Once the download is complete, navigate to the folder:
..\Steam\steamapps\content\app_1938090\depot_2790690\sp24
Copy the downloaded files to:
...\Steam\steamapps\common\Call of Duty HQ\sp24
This process has reportedly restored access to the campaign mode for some players.
General Troubleshooting Tips
- Update System Software: Ensure that your console or PC's system software is up to date. This can resolve compatibility issues and improve performance.
- Check Storage Space: Verify that you have sufficient storage space available for the game. If necessary, uninstall unused applications or consider using an external storage device.
- Verify Game Files: If the game is not launching or is experiencing issues, verify the integrity of the game files through your platform's client (e.g., Battle.net, Steam, Xbox app).
- Disable Antivirus Software: Temporarily disable any antivirus software, as it may interfere with the installation process. Remember to re-enable it afterward.
- Reinstall the Game: If all else fails, uninstalling and then reinstalling the game can resolve persistent issues.
How to Play Black Ops 6 With Top Performance?
If you want smoother gameplay, lower latency, and a more stable connection in Black Ops 6, NoPing can make a big difference. Online shooters depend a lot on fast and consistent network performance. High ping and packet loss affect your aim, delay your actions, and ruin clutch moments.
NoPing works by optimizing the route your connection takes to the game servers, reducing the time it takes for your commands to reach the match.
Here’s how to use NoPing to increase your performance in Call of Duty:
- Sign-up through the website and download NoPing (you can try it for free)
- Open NoPing and search for Call of Duty inside the software
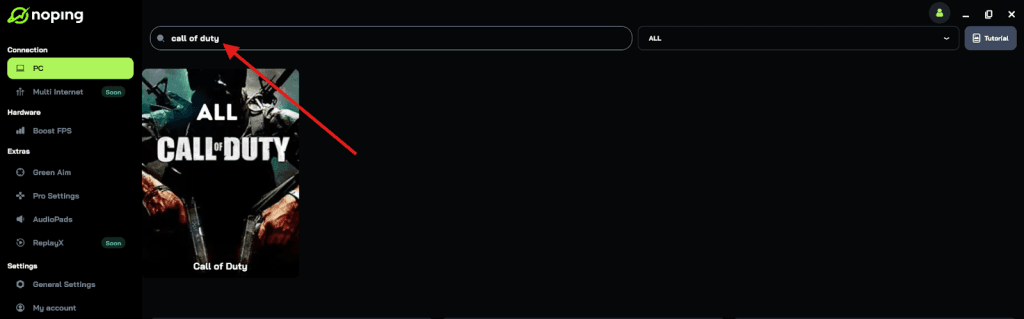
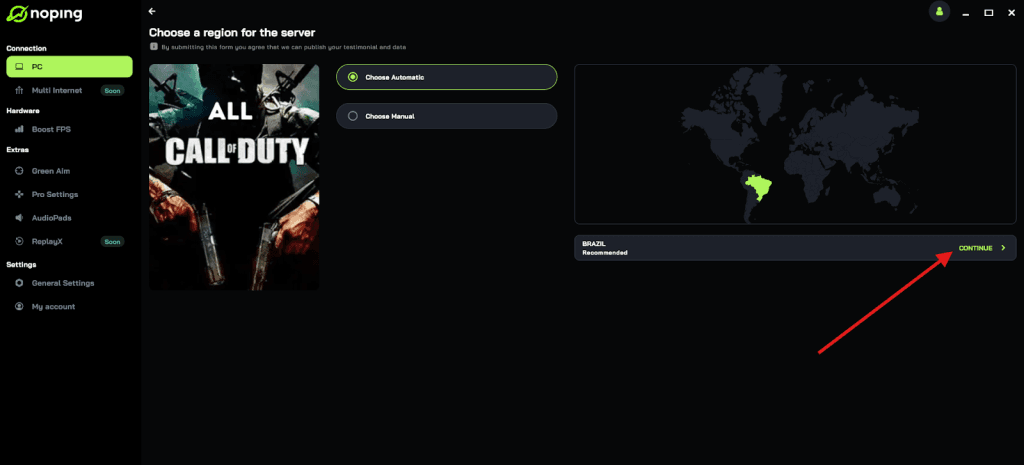
- Once you find Call of Duty, click on it and, on the next screen, select “Choose automatic” or “Choose manual” and click “Continue”. We recommend choosing automatic, as NoPing’s technology analyzes all routes on a global scale and automatically selects the best option for you.
- On the next screen, click on “Optimize Game”.
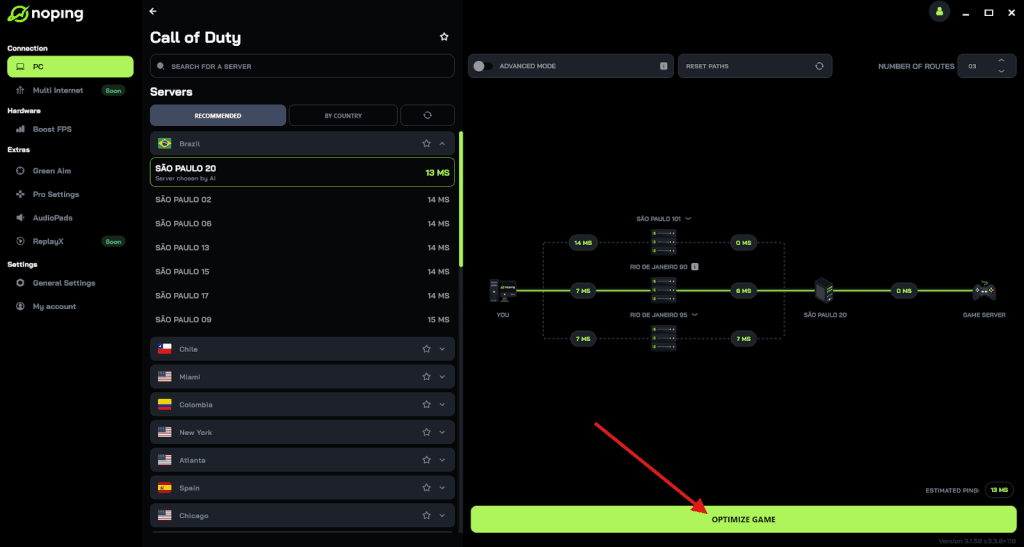
- And that’s it, you can start playing CoD with optimized ping!
You can test different servers within NoPing to see which gives you the lowest latency.
While Black Ops 6 installation issues can be frustrating, there are several steps you can take to resolve them.
By following the troubleshooting tips outlined above and staying informed about known issues, you can enhance your gaming experience.